Imposition
Correct imposition minimizes printing time by maximizing the number of pages per impression, reducing cost of printing time and materials.
Products and be impositioned on their own or as groups.
To allow products to be impositioned and printed in groups product groups must first be set up. (For insturction see artiicle on creating product groups )
Set up products for imposition
1.In the production goto the orders queue on the right of the screen, Select Job Groups.
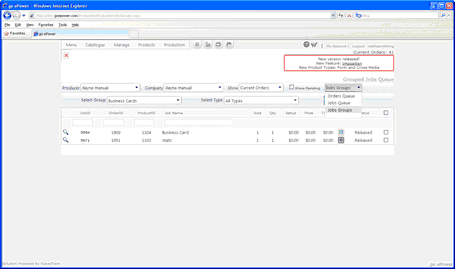
2.Select the dropdown. A list of the orders that are associated with that group will appear.
3.Click the checkbox to the right of the product(s) you want to set for imposition.
4.Click the imposition button.
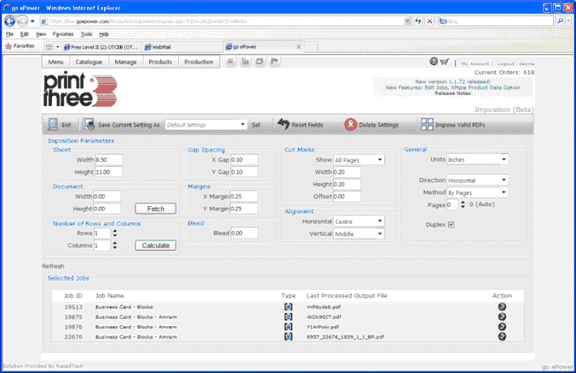
mposition Toolbar
a.Exit: Back to Jobs Groups list
b.Save Current Settings As: Save the current settings as name entered.
c.Setting Names Dropdown list: Saved settings by user.
d.Set button: Used to apply the selected setting to the parameters.
e.Reset Fields: Reset all settings to original.
f.Delete Settings: Delete the selected settings and show original.
g.Impose Valid PDFs: Process the jobs and create one PDF file.
Imposition parameters
Parameters
h.Sheet Group
i.Width: Finished sheet width in the selected units.
ii.Height: Finished sheet height in the selected units.
i.Document Group
i.Width: Document width in the selected units.
ii.Height: Document height in the selected units.
iii.Fetch button: get the size of the first valid document.
j.Number of Rows and Columns Group
i.Rows: No of Rows
ii.Columns: No of Columns
iii.Calculate: Calculate the number of rows and columns automatically.
k.Gap Spacing Group
i.X Gap: Distance between documents in the horizontal direction using the selected units.
ii.Y Gap: Distance between documents in the vertical direction using the selected units.
l.Margins Group
i.X Margin: Left or Right margin in the selected units when either Left or Right alignments selected.
ii.Y Margin: Top or Bottom margin in the selected units when either Top or Bottom alignments selected.
m.Bleed Group
i.Bleed: Amount of bleed in the selected units. Achieved by stretching the document the specified amount in all directions.
n.Cut-Marks Groups
i.Show: Can have one of four options
1.All Pages: Show on all pages.
2.None: Do not show cut-marks.
3.Odd: Show cut-marks on odd pages only.
4.Even: Show cut-marks on even pages only.
ii.Width: Width of the cut-mark in the selected unit.
iii.Height: Height of the cut-mark in the selected unit.
iv.Offset: Offset amount in the selected unit. Distance from the document to the start of the cut-mark.
o.Alignment Group
i.Horizontal: Can have one of three values
1.Centre
2.Left
3.Right
ii.Vertical: Can have one of three values
1.Middle
2.Top
3.Bottom
p.General Group
i.Units: Updates the fields automatically and can be either:
1.Inches (Default)
2.Centimetres
3.Millimetres
4.Points. (1 inch = 72 Points)
ii.Direction: Direction of laying out the documents
1.Horizontal: Side by side then going down
2.Vertical: Going down then side
iii.Method: One of two options
1.By Pages (Default): Assumes each file as one record.
2.By Records: Assumes each file as multiple records.
iv.Pages: If Method is By Pages then the value is the number of pages to be extracted from each file. If set to 0 then all pages are taken. If set to any other number then that many pages will be taken only. For files with less pages, blanks are added to complete the count. If Method is By Records then Pages would be the number of pages per record. A value of 0 for this method is the same as 1.
v.Double Sided: When set it adds a blank page if the file count is odd.
vi.
Selected Jobs:
Displays details of each selected job:
a.Job ID: Job IDs of the selected jobs
b.Job Name (Product Name)
c.Type: Product type (usually any product type with PDF output like XMPie, Blocks and TSVG)
d.Last Processed Output File: Link to download the last processed file. This is the file that will be used in the imposition process. It is the last processed file. If the job does not generate a PDF file (Like static products) then an Invalid message appears. If the job should create a PDF file but no file was generated then a No Valid File! message will display. The rows are colour coded according to status.
e.Action: A Create button displays if a file needs to be created before imposing, otherwise it will contain either a valid green icon or an invalid red icon.
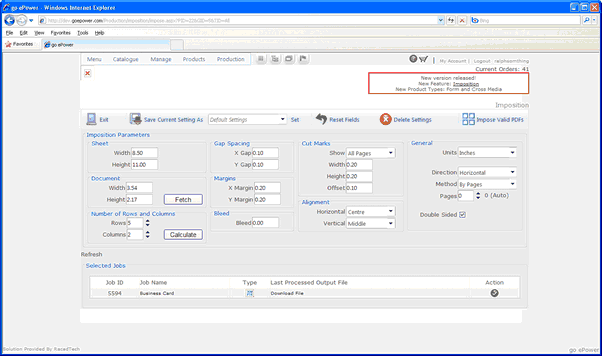
Click the “Impose Valid PDFs” button to display your imposed documents.
Was this article helpful?
That’s Great!
Thank you for your feedback
Sorry! We couldn't be helpful
Thank you for your feedback
Feedback sent
We appreciate your effort and will try to fix the article